Dev/QA/Staging/Production environments are shared resources and, like any shared resource, access to them must be managed; otherwise environment corruption may occur, resulting in loss of data and precious engineering time.
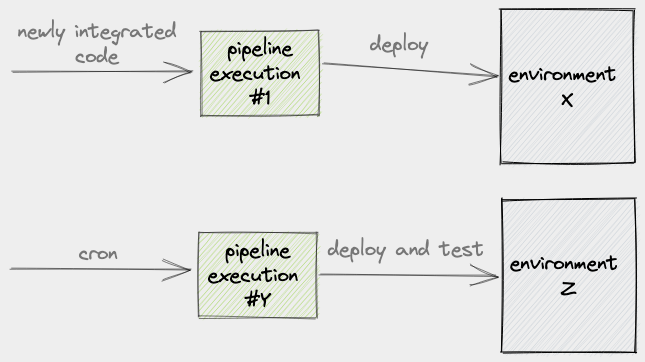
Take for example this scenario where we have a pipeline that deploys to an environment:
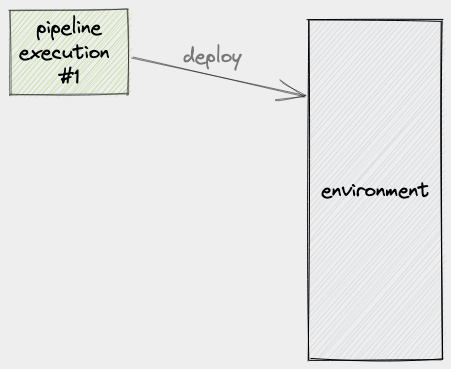
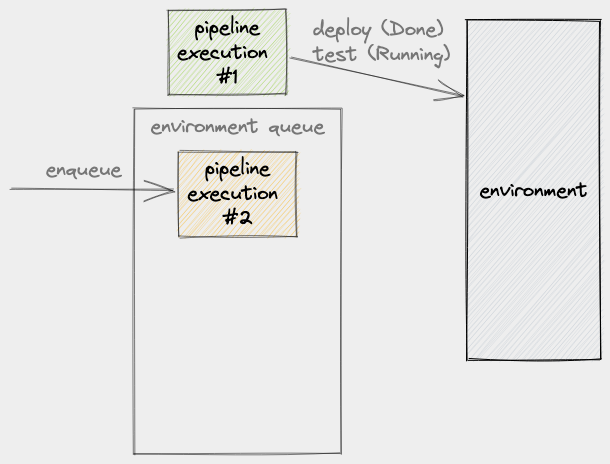
Usually, a pipeline execution (PE) includes running database migrations, collating assets, adjusting load balancers, running automated tests against the newly deployed build, and so on. What this means is that this process can take a few seconds to a few minutes. Let’s now consider what will happen when, during the period when PE #1 is still using the environment, another PE comes into play:

At this point, it’s safe to say that the output of PE #1 will be unreliable. We might even say that the output of PE #2 will also be unreliable. Ultimately, this will result in engineers debugging or fixing a failure that could’ve been prevented.
Even if you didn’t have automated tests running against your environments, you will still have the problem of an unreliable pipeline because you have more than one PE trying to modify the same environment.
Let’s now explore some of the solutions available to us.
Solution #1: Queue
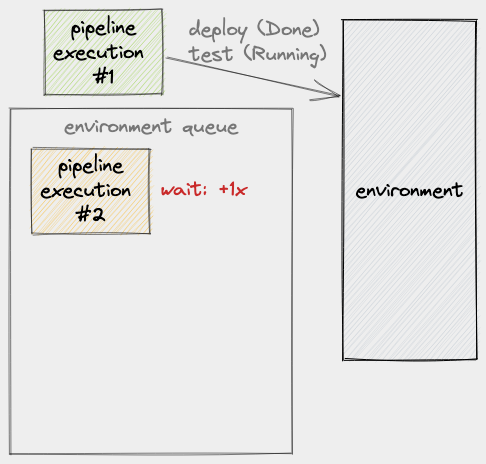
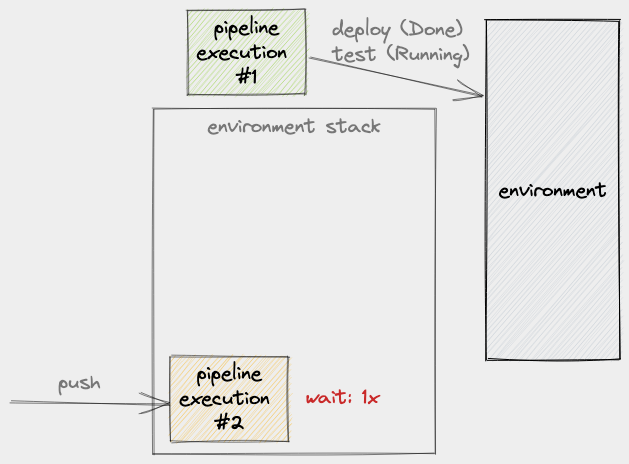
Putting a queue in front of the environment is the most obvious solution. Unfortunately, it’s not always the most optimal. Let’s see what a queue will do to our example environment. Given that PE #1 is already using the environment, when PE #2 comes into play, it gets queued:
As we established earlier, a PE’s use of an environment is not instantaneous, so we have to factor execution time into this scenario. If we say that the time a PE spends on an environment is x, we can then say that PE #2 will have a wait time of 1x:
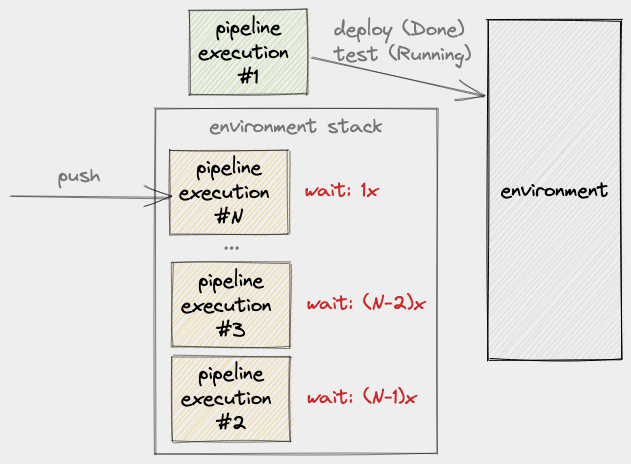
Let’s now say that, within the period when PE #1 is still using the environment, more PE’s are enqueued. Given this, we will see that each of these new PE’s will have to wait by, at most, (number of items in the queue at enqueue time) * x:
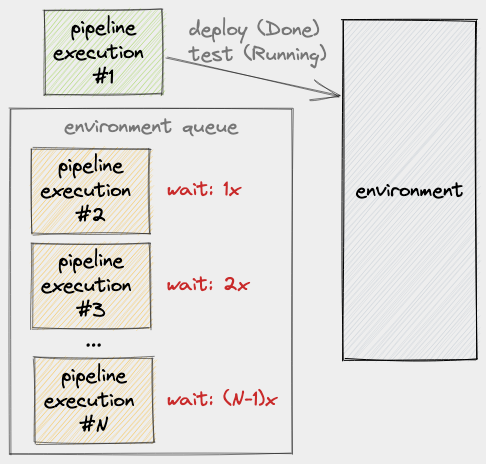
From here, we can see how implementing a queue can be problematic: as the day progresses, depending on how often a team integrates changes, the pipeline can lag further and further behind.
Solution #2: Nightly Builds
I’ve seen teams try fix the problem of a backed up queue by moving the long-running jobs to a nightly build:
The problem with this approach is that the pipeline has, once more, lost its reliability because it no longer performs a critical validation step. A likely thing that will happen is that, before the team can be fully confident in releasing to production, they will have to wait for the results from the nightly build: a possible delay of, at most, 24 hours.
An alternative scenario involves the team manually triggering the long-running pipeline tasks just before deploying to production. However, because multiple commits may have already been introduced prior to this, it’s possible that one or more test failures or errors have been introduced. If the team is in a time crunch to deploy to production, dealing with test failures at this time may not be their top priority. This, again, leads to a reduction of the pipeline’s reliability.
Solution #3: Stack
This section takes its lesson from the book Continuous Delivery by Jez Humble and David Farley:

The solution that they provide is basically to put a stack (as opposed to a queue) in front of the environment. Let’s see this solution in action. Recall that we have PE #1 that’s currently using the environment so when PE #2 comes into play at this time, it gets pushed to the environment’s stack:
Next, while PE #1 is still busy with the environment, more PE’s are pushed:
Notice how the last PE to be pushed to the stack always has a wait time of 1x whereas the older PE’s wait longer the older they are.
The latest PE will likely have a wait time of less than 1x but let’s just round it up to 1x for the sake of simplicity.
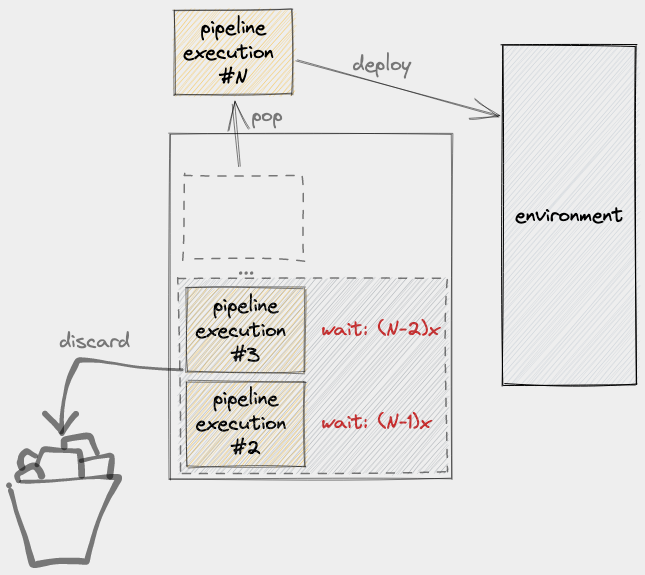
The next question is: what should happen when PE #1 is done using the environment? The obvious answer is to pop the latest item in the stack:
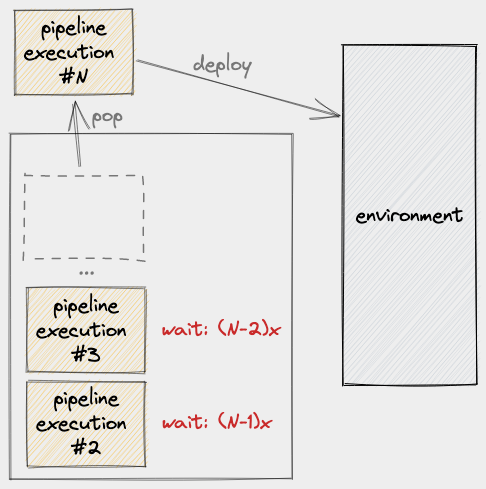
The question has two parts though and the answer to this second part is not so obvious: what do we do with the remaining items in the stack?
We could keep them but this would be a waste of computing resources since PE #N already incorporates the changes to PE #3 and PE #2 so there’s no point in deploying and testing them. This suggests that we should discard the older PE’s:
But what if a test failure/error was introduced by any of these older builds? How would we determine if it was introduced by PE #N or by any of the older PE’s? We could get fancy and perform a binary search to determine which change introduced the error; but does it really matter? Most likely it doesn’t and, if so, the team’s time is better spent just creating another pipeline execution that fixes the problem!
Concrete Example
Here’s a demo of solution #3. Unfortunately, this demo is old (Aug 2018) and still uses Jenkins because I haven’t been able to find the time to update it to a more moden CI/CD system. It should still serve as a useful example.
In this video, I use the term “Last in, first out (LIFO) Queue” instead of “Stack.” I don’t recall why I decided to use that term but whatever the reason, please excuse my earlier ignorance.
Here are the basic parts to implementing a stack in Jenkins. Make sure you’ve defined your stages the usual way. For example:
1
2
3
4
5
stage ('Automated Acceptance Tests'){
    steps {
        // Steps here
    }
}
So far nothing is different from the usual stage definition. Let’s now add the part that turns this stage into a stack. First, you’ll need to make sure that you’ve installed the Lockable Resources Plugin. With this plugin, you will be able to create cluster-wide “lock files.” Once you have that installed, modify your stage to look like the following:
1
2
3
4
5
6
7
stage ('Automated Acceptance Tests'){
    steps {
        lock(resource: "ProjectX-AAT") {
            // Steps here
        }
    }
}
In line 3, we added a lock() call which is a global function provided by
the Lockable Resources Plugin. We then specify
the name of the lock that we want to acquire which is ProjectX-AAT in this
case. Note that since the locks created by Lockable Resources are
global or cluster-wide, you have to add some prefix their names with a “scope”
to avoid unnecessary contention with other projects that have nothing to do
with yours. In this case, our scope prefix is ProjectX-.
By default, lock() uses a queue behind the scenes. To use a stack instead, we set the
inversePrecedence option:
1
2
3
4
5
6
7
stage ('Automated Acceptance Tests'){
    steps {
        lock(resource: "ProjectX-AAT", inversePrecedence: true) {
            // Steps here
        }
    }
}
At this point, when a PE is done with the Automated Acceptance Test stage,
the next PE to be granted the lock will be whichever was the last to
request it. This fully implements the stack in front of our environment.
But we’re not quite done yet because, while we now have a stack for our Automated Acceptance Tests stage, we still aren’t automatically discarding the older builds in the stack. That is, at this point, with the config that we’ve written thus far, once PE #4 is done, PE #3 will execute, followed by PE #2. What we want is for PEs #2 and #3 to be cancelled as soon as PE #4 is popped.
To achieve this, we will need another Jenkins plugin called Milestone. This is the plugin that allows newer builds to cancel old builds that haven’t reached a pre-determined milestone. Let’s put it to use:
1
2
3
4
5
6
7
8
stage ('Automated Acceptance Tests'){
    steps {
        lock(resource: "ProjectX-AAT", inversePrecedence: true) {
            milestone 100
            // Steps here
        }
    }
}
In line 4 we inserted the milestone keyword with some arbitrary numeric value as an argument. What that line tells Jenkins is that if there are any older builds that haven’t passed this milestone, cancel them. Let’s do a walkthrough to clarify:
- At time
t+0, PE #1 comes into play. It will run for 10 minutes; - At time
t+1, PE #2 comes into play and waits to acquire the lock namedProjectX-AAT; - At time
t+2, PE #3 comes into play. It also waits to acquire the lock forProjectX-AAT; - At time
t+3, PE #4 comes into play. It also waits to acquire the lock forProjectX-AAT; - At time
t+11, PE #1 is done with the stage and releases lockProjectX-AAT; - At this point, PE #4 is granted the
ProjectX-AATlock and reachesmilestone 100; - Because PE #3 and PE #2 are older than PE #4 and because they haven’t
reached
milestone 100yet, they are both cancelled;
Summary
In this article, we learned about the problem of an unmanaged shared environment and the downsides of queue-based and nightly-build-based solutions. We also learned that the most optimal way to share an environment without compromising the timeliness and reliability of a CI/CD pipeline is to put a stack in front of it that discards older builds whenever an item is popped.
If you want to know more about strategies to ensure a healthy CI/CD pipeline, See Jez Humble and David Farley’s Continuous Delivery book.