I’ve been spending a lot of time studying Open vSwitch and VXLAN lately and, often, found the need to quickly destroy and recreate my OVS environment. To speed up that process, I created my own Vagrant project which I’ve just made available on my Github account. You may find it here.
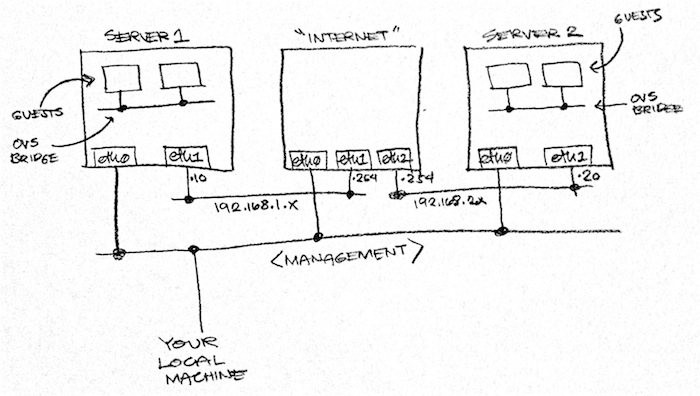
With a simple vagrant up command, you will be able to spin up two host machines
that talk to each other over a simulated Internet (which is implemented as another
VM). Each host machine comes with OVS 2.x and Mininet
so that you can spin up a handful of guest machines without consuming too much
resources. Each host machine consumes only 256 MB of RAM but can be increased
via the Vagrantfile in the project’s root directory.
OVS is installed via some .deb files that I built from source and shared via Dropbox so as to save time. If you don’t trust me enough, you can build it from source yourself by replacing nodes.pp with the nodes.pp.build_from_source file that I included in the same directory. Note that if you choose that route, make sure to increase the RAM for each VM to 512MB or OVS won’t compile.
Alright, go ahead and follow the README then come back here for more tips on what to do with the lab.
Cool! Now What??
Up next, I highly recommend David Mahler’s introduction to VXLAN overlays with Open vSwitch. Watch the video in its entirety then come back here for some hands on. Head on over to YouTube now. I’ll be waiting right here when you’re done.
Saw the Cool Intro. Now I Want Some Hands On!
That’s exactly what I said after watching it too! Lucky for you, I documented
what I did. All you have to do now is vagrant ssh server1 in one terminal,
and vagrant ssh server2 in another. Then follow the commands I listed in
shared/lesson01/commands.txt.
After that, don’t forget to check out what’s happening over the “Internet.” Open
another terminal then vagrant ssh internet followed by sudo su -. (Holy crap!
You just became root on the internet!!!). While red1 in server is pinging red2,
run tcpdump -n -i eth1 in internet and you will see the VXLAN encapsulated
packets zoom through.
Neat. What’s Next??
Well, that’s it for now. Try to explore some more on your own in the meantime. If you
mess things up, you can always vagrant destroy then vagrant up to go back
to the original state of the VMs. In my next post on this matter, I’ll be talking
about how to use this with the HW VTEP emulator that comes with OVS.
UPDATE 2014-09-27: Follow-up posts:
- Understanding Hardware VTEPs
- All About the OVSDB Server (AKA: Using OVSDB as a To Do List and Chat database)